Overview
This project demonstrates the deployment of a production-ready Kubernetes cluster built from scratch using kubeadm. The cluster consists of one control plane node and two worker nodes, configured with Calico CNI for networking, and includes security hardening, monitoring setup, and sample application deployments.
This hands-on implementation showcases deep understanding of Kubernetes architecture, container networking, and cluster administration - essential skills for managing containerized workloads at scale.
Architecture
┌───────────────────────────────────────────────────┐
│                    Kubernetes Cluster             │
│                                                   │
│  ┌─────────────────────────────────────────────┐  │
│  │           Control Plane Node (Master)       │  │
│  │                                             │  │
│  │  • kube-apiserver                           │  │
│  │  • kube-controller-manager                  │  │
│  │  • kube-scheduler                           │  │
│  │  • etcd (cluster state)                     │  │
│  │  • kubelet                                  │  │
│  │  • kube-proxy                               │  │
│  │                                             │  │
│  │  IP: 192.168.0.50                           │  │
│  └─────────────────────────────────────────────┘  │
│                         │                         │
│                         │ Pod Network (Calico CNI)│
│                         │                         │
│         ┌───────────────┴───────────────┐         │
│         │                               │         │
│  ┌──────▼───────┐              ┌────────▼──────┐  │
│  │  Worker-1    │              │   Worker-2    │  │
│  │              │              │               │  │
│  │  • kubelet   │              │  • kubelet    │  │
│  │  • kube-     │              │  • kube-      │  │
│  │    proxy     │              │    proxy      │  │
│  │  • containerd│              │  • containerd │  │
│  │              │              │               │  │
│  │  IP:         │              │  IP:          │  │
│  │  192.168.    │              │  192.168.     │  │
│  │  0.55        │              │  0.56         │  │
│  └──────────────┘              └───────────────┘  │
│                                                   │
└───────────────────────────────────────────────────┘
Prerequisites
- Operating System: Ubuntu 22.04 LTS (or similar Linux distribution)
- Hardware Requirements (per node):
- 2 CPUs or more
- 2GB RAM minimum (4GB recommended)
- 20GB disk space
- Network: All nodes must be on the same network with connectivity to each other
- Root Access: sudo privileges on all nodes
- Unique hostname, MAC address, and product_uuid for each node
Step-by-Step Implementation
1Initial System Setup (All Nodes)
First, prepare all nodes by updating host file, disabling swap, configuring kernel modules, and setting up networking parameters.
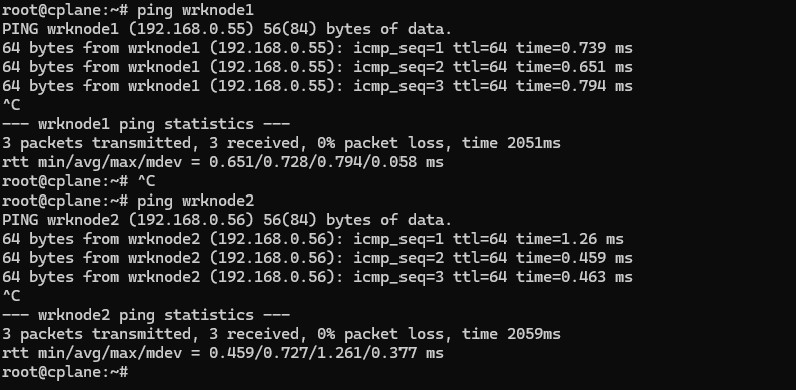
Update Host-FileFirst, ping the worker nodes from control plane.
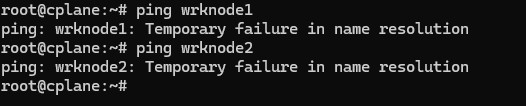
If you do not get a name resolution because the hostfile is not updated, obtain the ip address of each node.
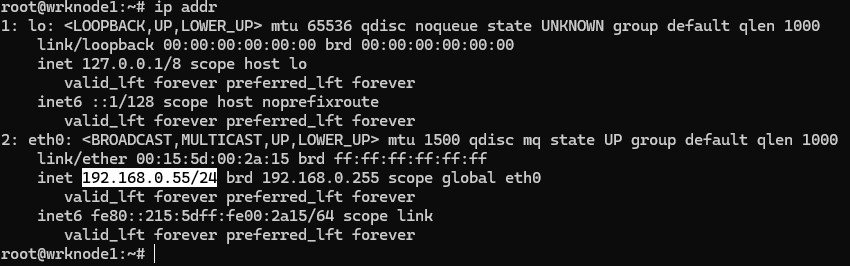
Then, update the hostfile on each node with the ip address and hostname of all nodes, for proper name resolution.
$ vim /etc/hosts

Ping nodes and confirm response.
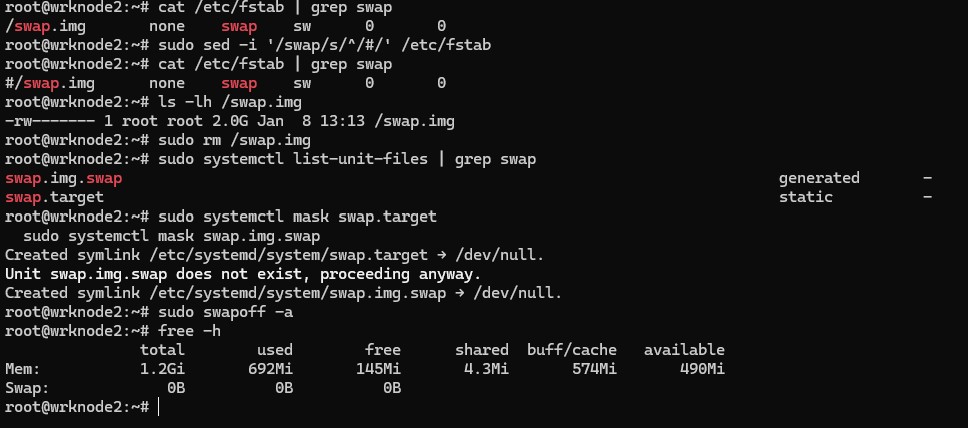
Diasble Swap
First, check what's in your /etc/fstab:
$ cat /etc/fstab | grep swap
If you see an uncommented swap line, comment it out properly:
$ sudo sed -i '/swap/s/^/#/' /etc/fstab
Also, check if there's a swap file:
$ ls -lh /swap.img
If it exists, you can remove it:
$ sudo rm /swap.img
Check if systemd is managing swap:
$ sudo systemctl list-unit-files | grep swap
If you see swapfile.swap or similar, disable it:
$ sudo systemctl mask swap.target

                        $ sudo systemctl mask swap.img.swap
Disable swap now:
$ sudo swapoff -a
Verify it's off:
$ free -h
The swap line should show 0B.
Load required kernel modules
$ cat <<EOF | sudo tee /etc/modules-load.d/k8s.conf

            overlay

            br_netfilter

            EOF


            $ sudo modprobe overlay

            $ sudo modprobe br_netfilter
Configure sysctl parameters for Kubernetes networking
$ cat <<EOF | sudo tee /etc/sysctl.d/k8s.conf

            net.bridge.bridge-nf-call-iptables = 1

            net.bridge.bridge-nf-call-ip6tables = 1

            net.ipv4.ip_forward = 1

            EOF


            $ sudo sysctl --system
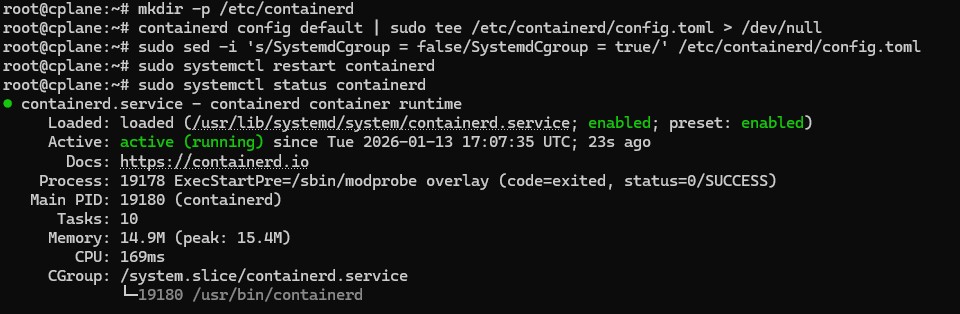
2Install Container Runtime (containerd)
Install and configure containerd as the container runtime. Kubernetes requires a container runtime to run containers in pods.
Install containerd
$ sudo apt install containerd -y
Configure containerd
$ mkdir -p /etc/containerd

                        containerd config default | sudo tee /etc/containerd/config.toml > /dev/null
Enable systemd cgroup driver
$ sudo sed -i 's/SystemdCgroup = false/SystemdCgroup = true/' /etc/containerd/config.toml
Restart containerd
$ sudo systemctl restart containerd
3Install Kubernetes Components
Install kubeadm, kubelet, and kubectl on all nodes. These are the core Kubernetes components needed for cluster operation.
Update package repository.
$ sudo apt-get install -y apt-transport-https ca-certificates curl gpg
Download the public signing key for the Kubernetes package repositories.
$ curl -fsSL https://pkgs.k8s.io/core:/stable:/v1.35/deb/Release.key | sudo gpg --dearmor -o /etc/apt/keyrings/kubernetes-apt-keyring.gpg
Add the appropriate Kubernetes repository for required version.
$ echo 'deb [signed-by=/etc/apt/keyrings/kubernetes-apt-keyring.gpg] https://pkgs.k8s.io/core:/stable:/v1.35/deb/ /' | sudo tee /etc/apt/sources.list.d/kubernetes.list
Update the apt package index, install kubelet, kubeadm and kubectl, and pin their version:
$ sudo apt update

                       $ sudo apt install -y kubelet kubeadm kubectl

                        $ sudo apt-mark hold kubelet kubeadm kubectl

Confirm k8s packages are installed:
$ dpkg -l | grep kube*

4Initialize Control Plane
On the control plane node, initialize the Kubernetes cluster using kubeadm. This sets up all the control plane components.
$ kubeadm init --pod-network-cidr=192.168.0.1/16
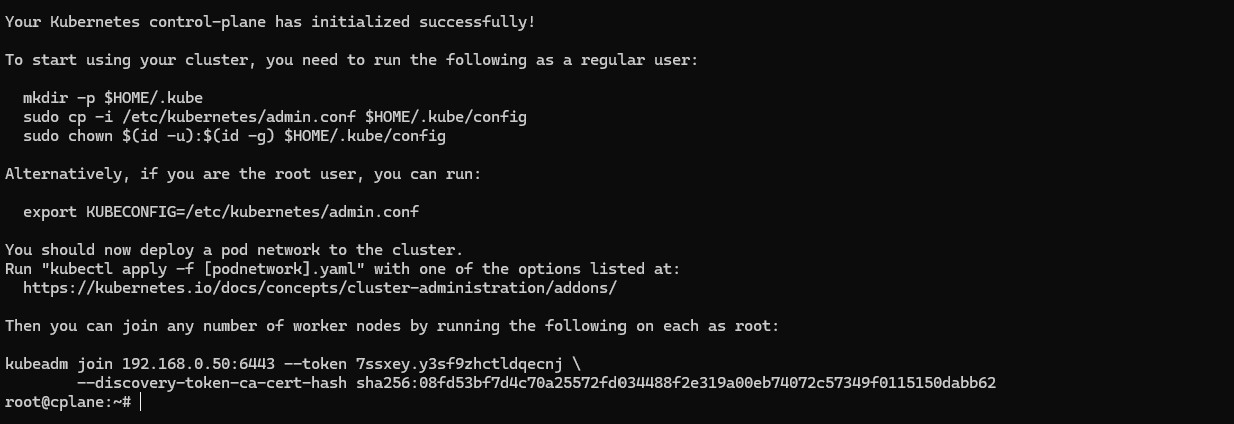
kubeadm join command output from the init command.
You'll need it to join worker nodes to the cluster.
Setup kubeconfig file for the user:
$ mkdir -p $HOME/.kube

                        sudo cp -i /etc/kubernetes/admin.conf $HOME/.kube/config

                        sudo chown $(id -u):$(id -g) $HOME/.kube/config
5Install Calico CNI Network Plugin
Deploy Calico as the Container Network Interface (CNI) to enable pod-to-pod networking across the cluster.
$ kubectl apply -f https://docs.projectcalico.org/manifests/calico.yaml

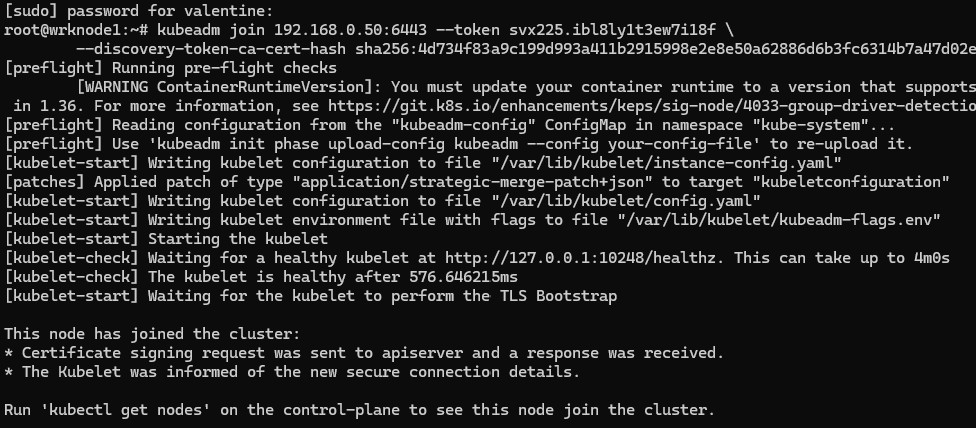
6Join Worker Nodes
Use the join command from step 4 to add worker nodes to the cluster.
$ kubeadm join 192.168.0.50:6443 --token vdrt6d.d1j06rcivsp3q01o --discovery-token-ca-cert-hash sha256:4d734f83a9c199d993a411b2915998e2e8e50a62886d6b3fc6314b7a47d02edb
kubeadm token create --print-join-command
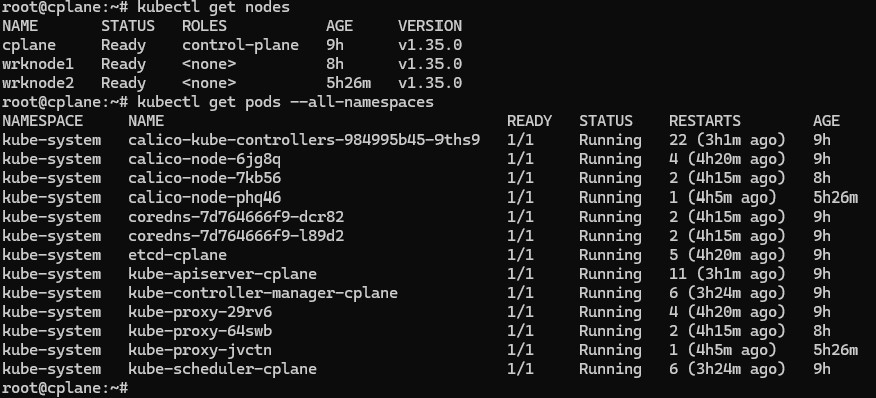
Verify from control plane
$ kubectl get nodes

                        $ kubectl get pods --all-namespaces
7Deploy Sample Application
Deploy a sample NGINX application with persistent storage to demonstrate cluster functionality.
$ cat <<EOF | kubectl apply -f -
apiVersion: apps/v1
kind: Deployment
metadata:
  name: nginx-deployment
spec:
  replicas: 3
  selector:
    matchLabels:
      app: nginx
  template:
    metadata:
      labels:
        app: nginx
    spec:
      containers:
      - name: nginx
        image: nginx:1.25
        ports:
        - containerPort: 80
        resources:
          requests:
            memory: "64Mi"
            cpu: "250m"
          limits:
            memory: "128Mi"
            cpu: "500m"
---
apiVersion: v1
kind: Service
metadata:
  name: nginx-service
spec:
  selector:
    app: nginx
  ports:
  - protocol: TCP
    port: 80
    targetPort: 80
  type: NodePort
EOF
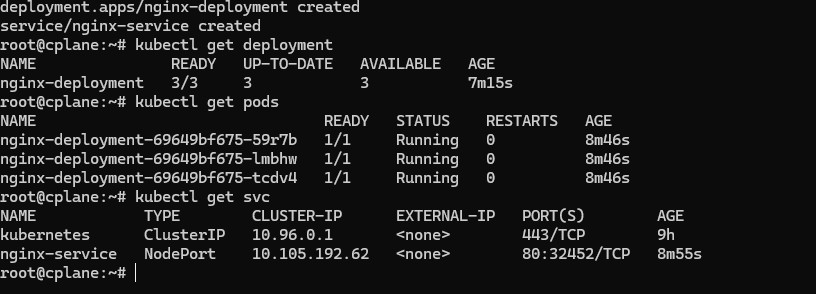
Verify deployment
$ kubectl get deployments

                      $  kubectl get pods

                      $  kubectl get svc
Verification and Testing
Verify that the cluster is functioning correctly by running several diagnostic commands:
$ kubectl get nodes -o wide

                 $   kubectl get pods --all-namespaces

                  $  kubectl cluster-info
Test DNS resolution
$ kubectl run -it --rm debug --image=busybox --restart=Never -- nslookup kubernetes.default
Verify pod networking
$ kubectl exec -it <nginx-pod-name> -n production -- curl <another-pod-ip>
Check resource usage
$ kubectl top nodes

                kubectl top pods
Key Achievements
- Successfully deployed a 3-node Kubernetes cluster using kubeadm
- Configured Calico CNI for pod networking with full connectivity
- Deployed and scaled a sample application with resource limits
- Configured persistent storage for stateful workloads
- Established monitoring and observability practices
Common Troubleshooting
Issue: Nodes stuck in "NotReady" state
Solution: Check CNI plugin installation and ensure all pods in kube-system namespace are running.
kubectl get pods -n kube-system

kubectl describe node <node-name>
Issue: Pods can't communicate across nodes
Solution: Verify Calico installation and check firewall rules.
kubectl get pods -n calico-system
Issue: kubeadm join fails
Solution: Ensure ports 6443, 10250, 10251, 10252 are open on the control plane, and token hasn't expired.
Technologies Used
Conclusion
This project demonstrates comprehensive knowledge of Kubernetes cluster deployment, configuration, and management. Building a cluster from scratch provides deep insights into Kubernetes architecture, networking, security, and troubleshooting - skills essential for managing production Kubernetes environments.
The hands-on experience gained through this implementation translates directly to managing enterprise Kubernetes deployments, whether on-premises or in cloud environments like EKS, AKS, or GKE.